![]() About two years ago I started my blogging journey, I wanted a way to reflect on the workshops I deliver to researchers – to jot down the context, share the resources used. I’m a reasonably confident and competent tech user but had no clue about blogging platforms. This is why I chose posterous.com as my starting place because it was pretty simple to use allowing me to focus on writing content rather than worrying about templates or html or css editors…
About two years ago I started my blogging journey, I wanted a way to reflect on the workshops I deliver to researchers – to jot down the context, share the resources used. I’m a reasonably confident and competent tech user but had no clue about blogging platforms. This is why I chose posterous.com as my starting place because it was pretty simple to use allowing me to focus on writing content rather than worrying about templates or html or css editors…
Then about a year ago, posterous announced that they had been acquired by twitter. It was at that point that I began to look around for alternatives because I had a sneaking suspicion that posterous would close down at some point…. and so it has now been announced that posterous will close at the end of April.
I have already made the jump from posterous to wordpress in August of last year – I know many folks will be thinking about doing the same so I thought I’d share my experience of doing so.
The first step is to export the content of your Posterous blog – you can do this right from your “manage spaces” panel in posterous by clicking on the “backup” button – see below
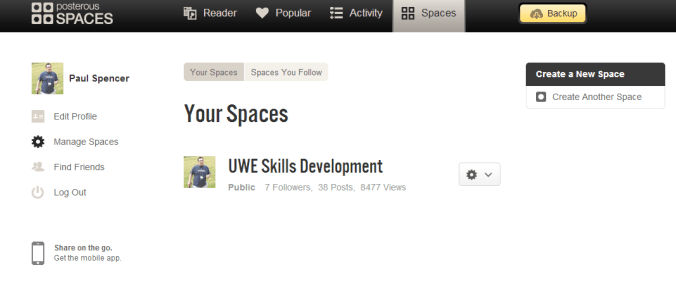
This could take a while but eventually you’ll get a zipped archive of your blog.
The next step is then to take it to another blogging platform, in this case I am talking about wordpress but before I carry on it’s important to stress the difference between wordpress.org and wordpress.com. The former is an open source website architecture that relies on you having your own webspace and domain name whereas the latter is both a website template AND a hosting space combined. If, like me, you want to keep things as simple as it was with posterous then a wordpress.com blog is what you’ll probably prefer!
WordPress.com offer a free blogging solution – this allows you to store upto 3GB of data (text, images etc) and gives you freedom to call your blog anything you like with the suffix .wordpress.com. For most folks this will be adequate. You can customise the theme of your blog with a diverse range of templates etc.
I chose to pay a fee for my new blog – thedigitaldoctorate.com – it cost $99 per year. This gives me an extra 10GB storage, makes my blog advert free and allows a few extra bells and whistles (like having a .com url).
Once signed up then importing your archive from posterous is easy, you use a dedicated import tool right from the control panel (dashboard) of your new blog; it will transfer across all your text entries, comments and hyperlinks. The official advice on this is easy and straightforward to follow http://en.support.wordpress.com/import/import-from-posterous/
Things I’ve learned
1) The embedded documents that you had in posterous won’t have come across in the import – you may have a hyperlink to the document which takes you back to the posterous blog (which won’t be there in May…!). This creates a headache for folks like me who tend to embed powerpoints/word docs/pdfs into all my posts. There’s no easy way to say this but you have to find all the original files and do one of two things–
(i) Upload those files to a 3rd party document store e.g. scribd – you can upload many files at once using the desktop uploader (handy!). The advantage of using scribd (or similar) is that you can edit the attributes of the file in terms of what folks can do with it (e.g. disable download/printing). Having your documents here is also handy for connecting up to LinkedIn etc – promotes your professional stuff across a number of platforms. Scribd also have a wordpress.com specific embed shortcode which makes it easier to embed docs into your posts. The downside is that this is a two step process and a serious pain in the arse if you have a couple of hundred files to upload and then re-embed into individual posts.
(ii) You can upload the files directly into your wordpress “media library”, this is easy enough to do and here is the guidance on that http://en.support.wordpress.com/uploading-documents/. Only note of caution here is that this could eat into your data allowance if you have many large powerpoints/pdfs, especially if you have the free blog which is capped to 3GB.
2) It is a pain in the rear to embed prezis into a wordpress.com blog (as opposed to a wordpress.org site). This is because WordPress.com does not support iframes because of security concerns. There is a workaround which involves taking the embed code from your prezi and editing it to work with wordpress.com. I hated this. There are a couple of simple web apps out there that can do that bit for you.
Update:
The following shortcode generators have stopped working correctly for new and recently edited prezis. The end result is that you can embed the prezi but it will not load. Hopefully enough folks will have complained about this for either Prezi or WordPress.com (or both) to find a solution to this.
Simply copy the url of the prezi you want to embed, paste into the generator and click ‘shortcode?’ Then you copy the long string, paste into your blog – et voila problem solved.
3) Uploading photos into your media library is a cinch and it is easy to create a slick slideshow in your posts. Here’s the support page, it’s a piece of cake! http://en.support.wordpress.com/images/gallery/
4) Embedding youtube videos is also really easy – I find the easiest way is to simply grab the url of the video and click the add media (from url) button in the editing pane – paste in url and click insert into post. This works for most media types at the end of a url.
5) TED videos have a special wordpress embed shortcode – really easy!
There’s a few tips to be getting on with – if I think of anymore then I’ll update!

Pingback: New post Writing Challenge: Image vs. Text | Family Photos Food & Craft
Pingback: Blog Transfer | Rafferty's Rules
Pingback: Posterous 2 WordPress | Business Intelligence Survival Kit